

How to Care for Outdoor Potted Plants the Easy Way
You're standing on a sunny porch, looking at a drooping geranium in a pot that still feels strangely heavy. Should you water it again, or is the soggy soil the problem? Outdoor containers can leave beginners second-guessing every decision, but caring for them becomes much easier once you focus on a few repeatable habits.
This guide to how to care for outdoor potted plants follows four simple ideas: start with the right pot and soil, build a confident watering rhythm, choose a spot that suits the plant, and keep up with gentle seasonal care. The aim isn't perfect gardening. It's creating conditions that help roots stay balanced while making daily maintenance realistic for busy owners, travelers, apartment dwellers, and anyone with a small outdoor space.
A Calm Start to Caring for Outdoor Potted Plants
The geranium on the porch may look thirsty because its leaves are soft and hanging down. Yet if the pot is waterlogged, adding more water can make the roots less healthy rather than helping them recover. Container plants have a limited root zone, so excess moisture has fewer places to go and can interfere with flowering and root health. Research from the University of Reading found that impatiens and petunias produced more flowers and bloomed longer when watered with only about one teacup per day, roughly 6 ounces, or about 177 mL. The same report said a typical plant in an average-sized container may grow well with as little as half a teacup daily, highlighting that outdoor pots are often overwatered rather than underwatered. Read the University of Reading watering summary
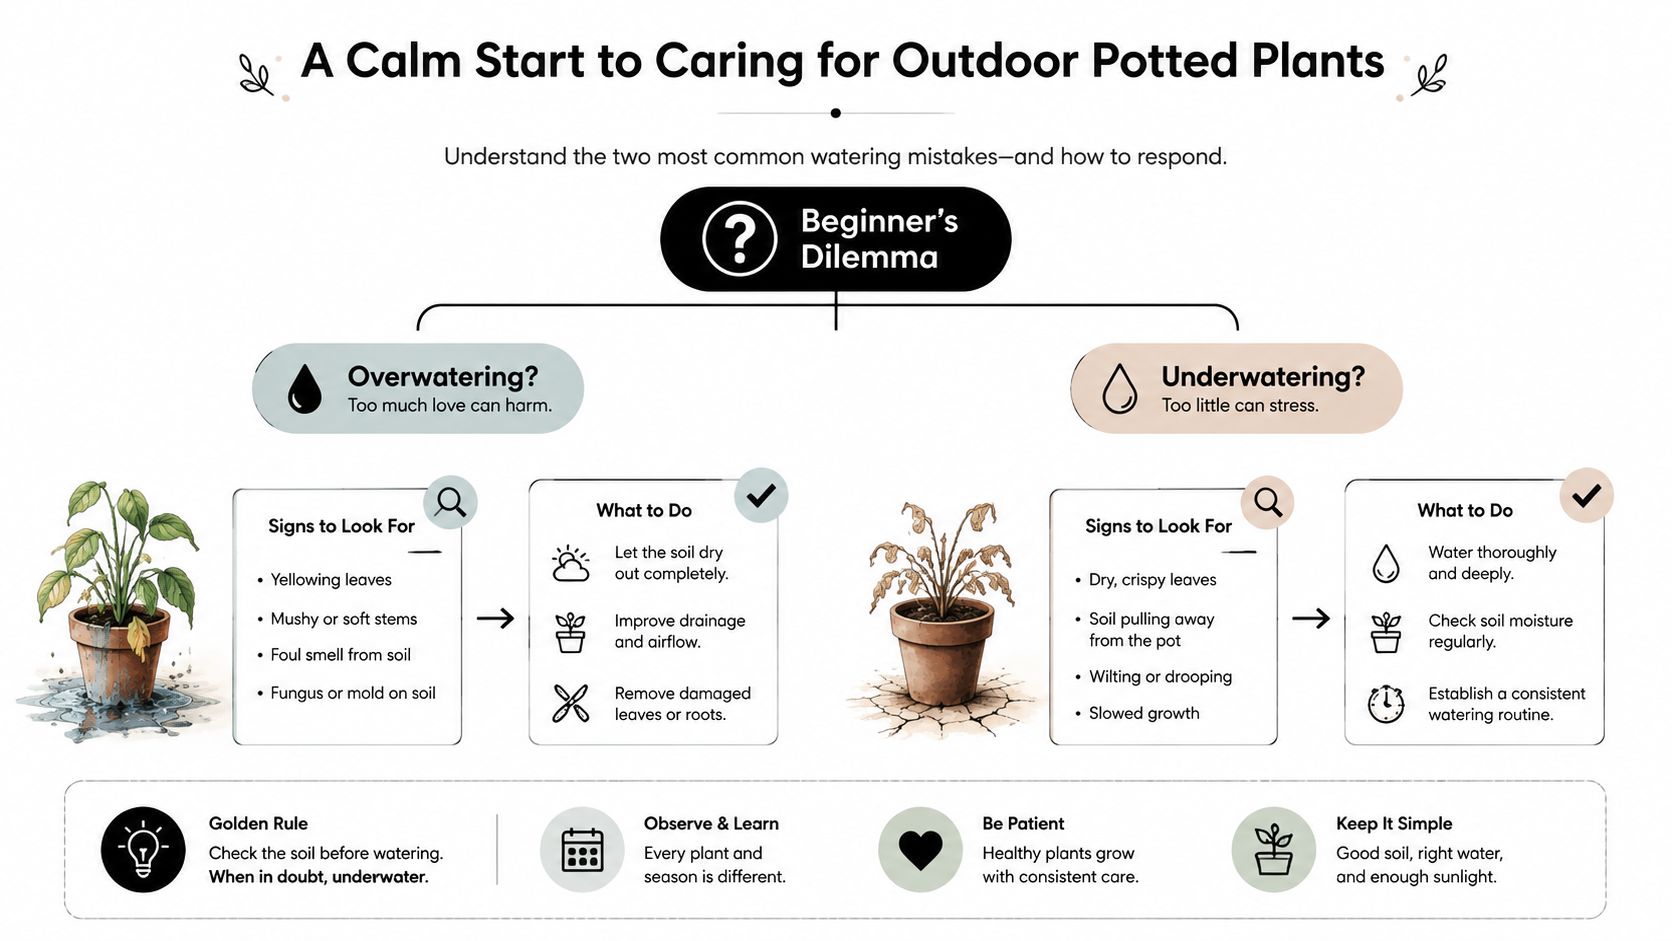
Four small decisions
Think of plant care as four small habits rather than a long chore list:
- Set up the root zone: Choose a container with drainage and a loose potting mix.
- Check before watering: Feel the soil instead of following a fixed calendar.
- Match the location: Light, wind, reflected heat, and shelter all change how quickly a pot dries.
- Tidy gently: Feed only when the plant is actively growing, remove damaged growth, and watch for early signs of trouble.
A sunny patio may dry a small terracotta pot quickly, while a shaded stoop may leave a larger glazed pot moist for longer. Colorado State University outdoor container trials lasting 14 and 15 days found that container types differed in water use by about 1.6 L and 4.4 L, respectively. Over an approximate 200-day growing season, the dissertation estimated that one container type could use 21.3 L to 58.5 L less water than another, showing why pot material, design, and irrigation strategy matter. Review the Colorado State University container research
If you're unsure how to combine plant colors, pot shapes, and placement in a small space, a visual planning tool such as garden AI design can help you explore an arrangement before moving heavy containers. For everyday care, though, a simple finger check and a short look at the leaves will usually tell you more than a complicated schedule.
Choosing the Right Pot Soil and Drainage Setup
A healthy outdoor container starts beneath the foliage. The pot must let excess water leave, and the mix must hold enough moisture for roots without collapsing into a dense, airless block.
Terracotta is porous, so it can dry faster, especially in sun and wind. Glazed ceramic generally holds moisture longer, while plastic is lightweight and tends to retain water. Fabric pots allow strong airflow around the root area, but they can dry quickly from all sides. None is automatically right for every plant. A moisture-loving plant may appreciate a less porous container, while a drought-tolerant plant often benefits from faster drying.
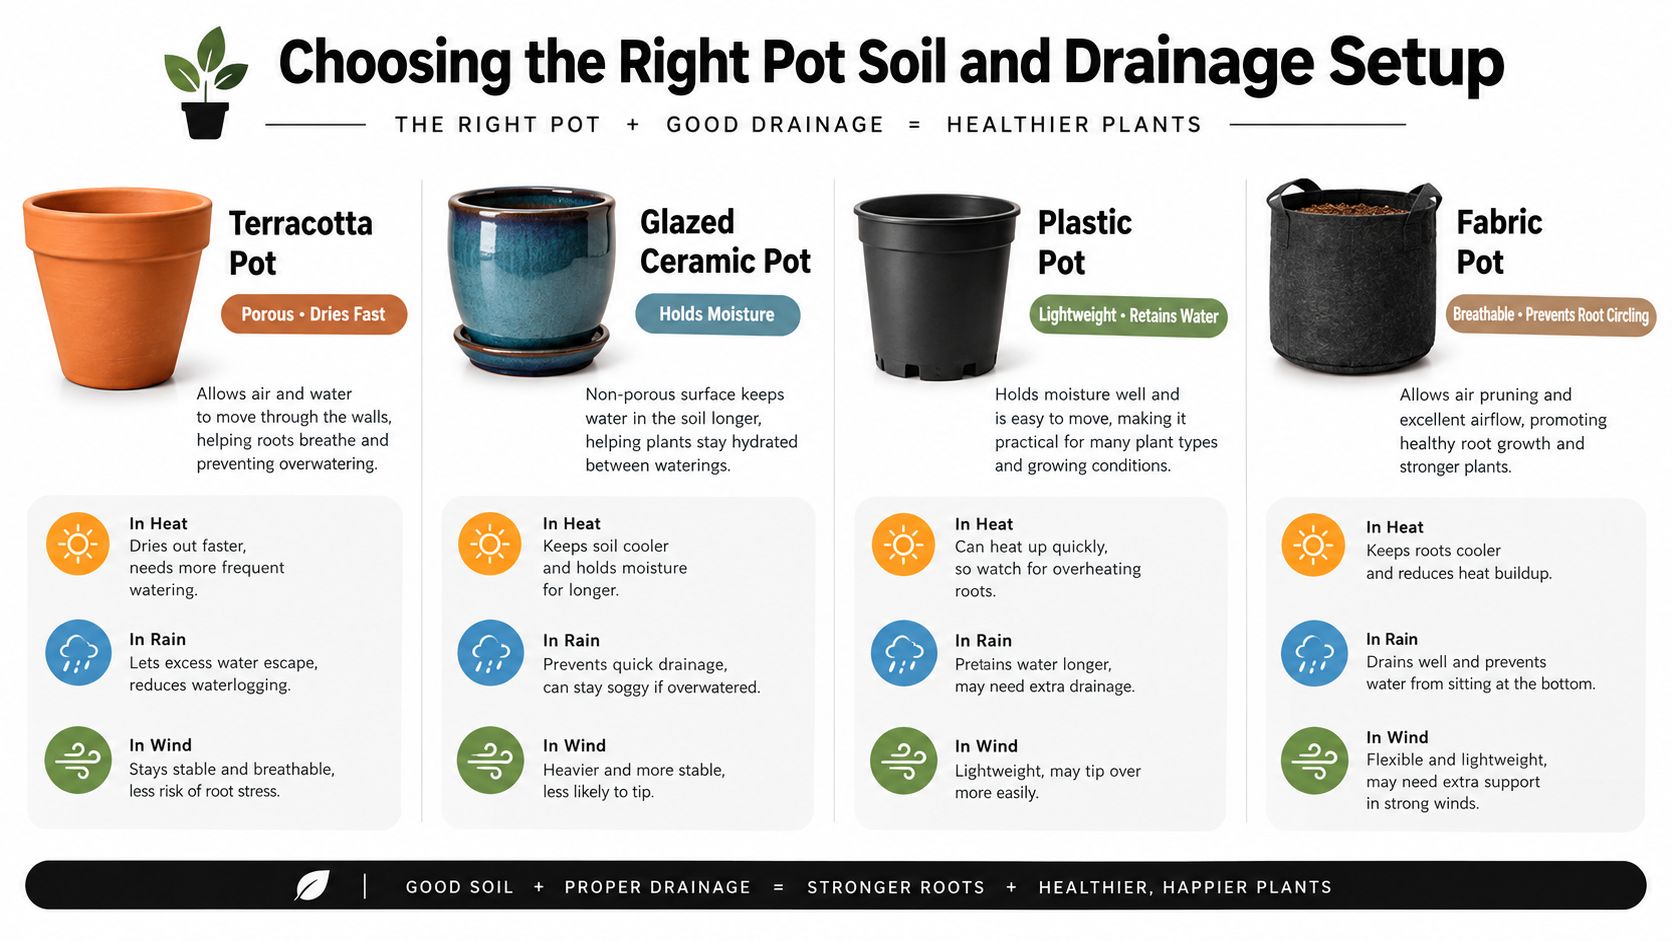
Build a root-friendly base
Drainage holes are essential. A decorative pot without holes can still work as an outer cachepot if the plant remains in a separate draining container. If you want to plant directly into a hole-free vessel, use a suitable drill bit to create openings, protect the mix with a mesh screen, and raise the pot slightly on feet so the openings don't sit flush against a patio.
Skip the traditional layer of rocks or gravel at the bottom. Extension and horticulture guidance explains that this layer isn't needed and can worsen water-retention problems in the root zone. A saucer can protect a balcony or patio, but empty it after watering rather than allowing roots to sit in stagnant water.
Practical rule: Water should move through the root ball, not collect beneath it.
Garden soil often compacts inside containers and leaves roots with too little air. Use a quality potting mix instead, commonly built around peat or coir with materials such as perlite, bark, or compost to improve structure. If you're curious about coir's role in gardening mixes, this guide to coir for gardening offers useful background.
Before planting, use this quick setup check:
- Pot size: Choose a container that gives the root ball room to grow without placing a small plant in a huge reservoir of wet mix.
- Top space: Leave a little room below the rim so water doesn't immediately spill over.
- Surface cover: Add a light mulch layer to reduce evaporation, keeping it away from the stem.
- Rainy patios: Keep saucers available for surface protection, but empty them promptly after the pot drains.
For a visual demonstration of container preparation and planting, watch this container gardening video.
Watering Outdoor Potted Plants with Confidence
A pot on a sunny balcony can look fine in the morning and feel unexpectedly light by afternoon. Watering becomes easier when you make two separate decisions: when to water and how much to apply.
Test the potting mix first. Press a finger into the upper inch or two, or lift a small container to notice whether it has become lighter. If the upper zone feels dry, pour slowly until the whole root ball is moist and excess water begins to leave the drainage holes. Virginia Cooperative Extension's container guidance recommends judging the plant's need by soil moisture rather than by the amount that drains out.
A gentle, moving pour reaches more roots than a quick splash. Circle the soil surface so water does not cut a channel down one side. If the mix repels water, pause and let it absorb before continuing. Once water drains from the bottom, let the pot finish draining and empty the saucer within 60 minutes. Otherwise, the surface may look wet while lower roots remain dry or sit in stagnant water.
Morning watering gives leaves time to dry and lets the plant use moisture during the brighter part of the day. Aim the stream at the soil, especially in strong sun, instead of wetting the foliage. Warm, windy weather calls for more frequent checks. Small pots may need attention once or twice a day, while larger containers in cool weather may need it only once or twice a week, depending on local conditions.
| Season | Check Frequency | Watering Depth | Self-Watering Globe Role |
|---|---|---|---|
| Spring | Check when weather changes or the plant begins active growth | Moisten the entire root ball when the upper mix is dry | Helpful during busy days, but still check the soil |
| Summer | Check daily during hot, windy periods, especially in small pots | Water slowly until moisture reaches the lower roots and drains | Supplements hand watering between checks |
| Fall | Reduce checks as temperatures cool, while watching sunny containers | Water thoroughly when the dry upper zone shows the plant needs it | Useful during irregular routines, with reservoir monitoring |
| Winter | Check less often when growth slows, adjusting for shelter and rain | Avoid watering on a calendar if the mix remains moist | Usually a minor aid rather than a replacement for judgment |
For a weekend away, a self-watering globe can release moisture gradually as the soil dries. Match its size to the pot and plant, then test it while you are home. It should support the root zone without flooding it. This self-watering patio planter guide offers a way to compare lower-effort options for busy owners or small-space gardeners.
Finding the Best Spot for Sunlight and Shelter
A plant's location changes its care plan. Two identical pots can need different attention if one sits beside a heat-reflecting wall and the other rests in cool, filtered shade.
Consider three common outdoor scenes. On a south-facing patio, bright light and warm paving can dry a small pot quickly. Check the soil early, group containers where practical, and move tender plants to a sheltered corner during a heatwave. A shaded front stoop may stay moist longer, so plants there need closer attention to slow drying and airflow rather than automatic extra water.
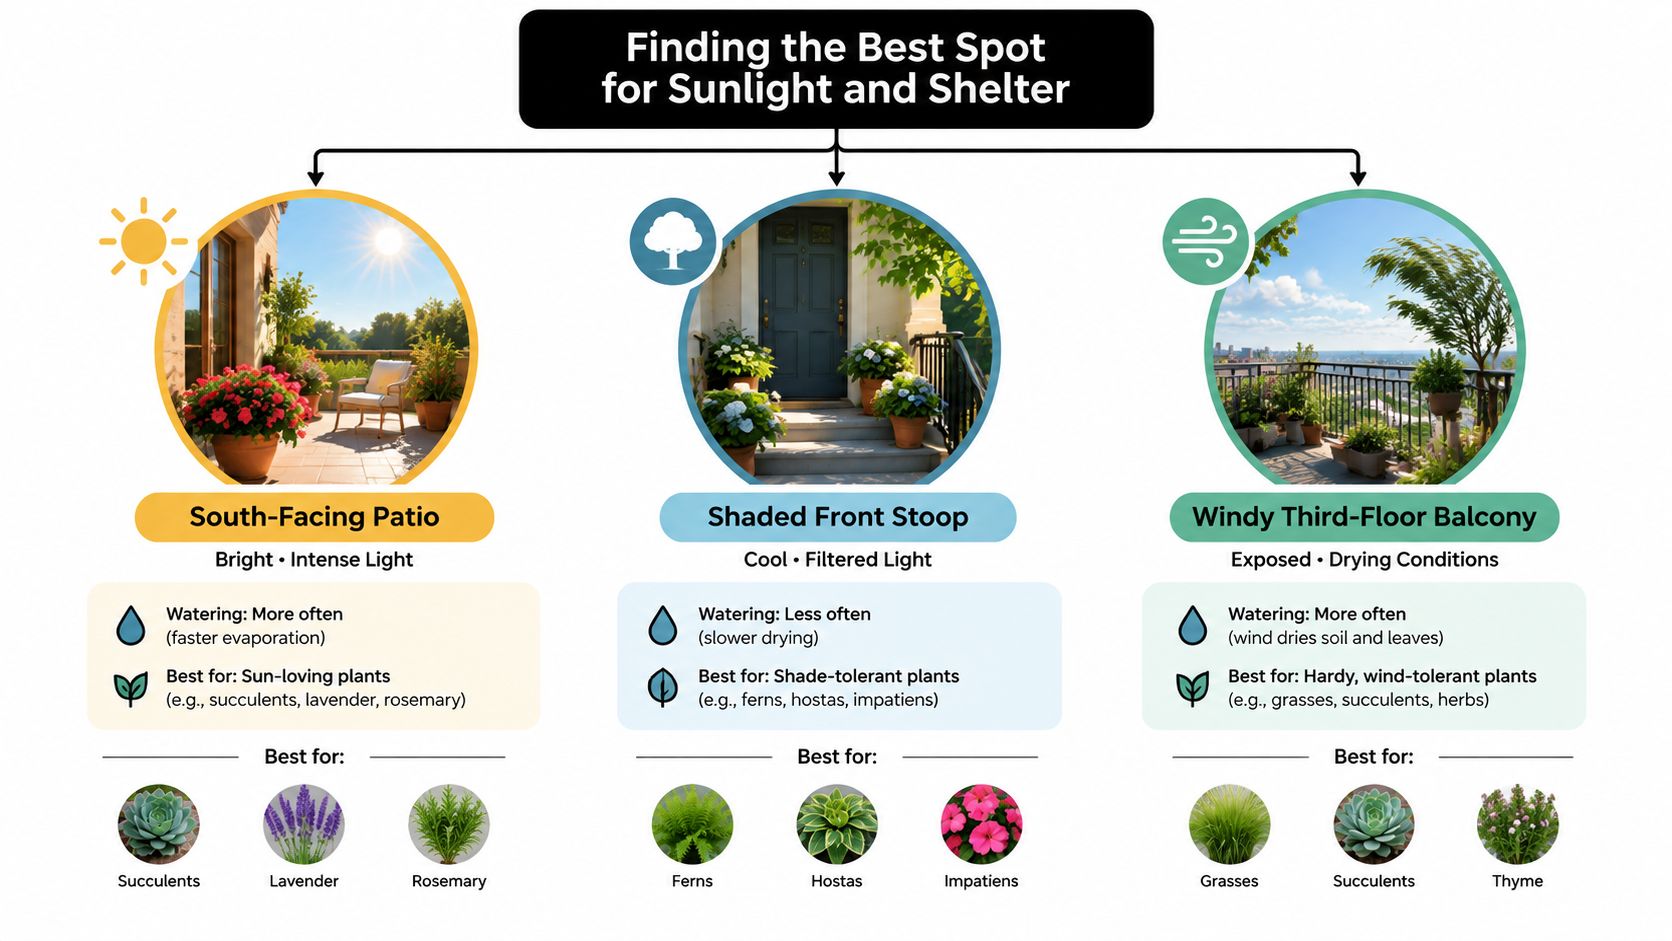
A windy third-floor balcony creates a different challenge. Moving air pulls moisture from leaves and potting mix, and exposed containers can tip or dry unevenly. Grouping pots together can create a slightly more sheltered pocket, while heavier outer containers can protect lighter ones. Use the plant's light needs to create groups for full sun, part sun, and shade, so your watering checks become more predictable.
Read the space before relocating everything
Watch where shadows fall in the morning, midday, and afternoon. A simple shadow test reveals whether a location receives direct or filtered light during the strongest part of the day. Rotate containers a quarter turn from time to time so one side doesn't grow toward the light.
Placement also affects any watering aid you use. A small pot in full sun may need a more frequent check than a larger pot in shade, while a globe in a windy position may empty sooner than expected. Test the arrangement before relying on it.
As the sun angle shifts through the seasons, move containers gradually rather than making a dramatic change in one afternoon. A plant that enjoyed gentle spring light may need protection from stronger summer exposure, while a shaded winter corner may become brighter later.
Feeding and Pruning Without the Stress
Feeding and pruning should feel like small tidy-up habits, not a demanding schedule. A newly potted plant usually has enough available nutrition in its fresh mix, and a stressed or dormant plant is better left to recover than pushed with fertilizer.
During active growth, use a diluted liquid fertilizer every two to four weeks, following the product label rather than guessing at strength. A light feed in early spring can support new growth, steady feeding can continue while the plant is actively producing leaves or flowers, and the routine should taper as fall arrives. Slow-release granules suit forgetful gardeners because they reduce the need for repeated applications, but they still require careful label reading.
Underfeeding is usually easier to correct than overfeeding.
Avoid feeding when the plant has just been repotted, is wilted from stress, or has entered dormancy. Fertilizer can't solve a drainage problem, a damaged root system, or a plant sitting in the wrong light. Fix the growing conditions first.
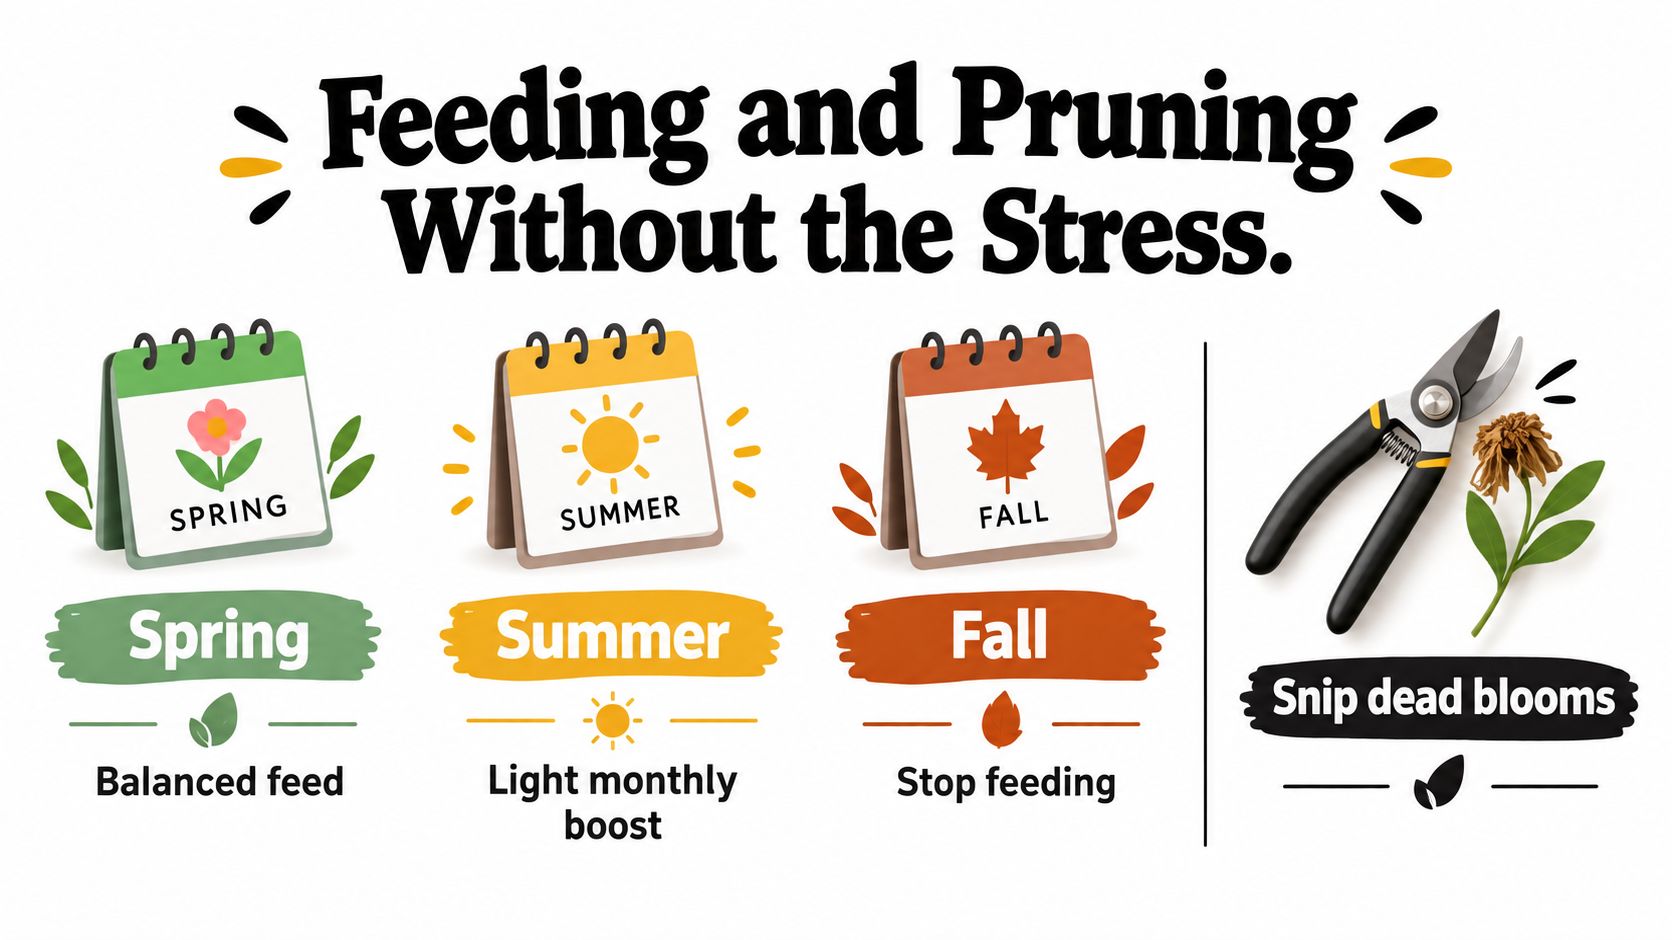
Pruning can be just as gentle. Pinch leggy new growth to encourage a fuller shape, remove yellow or dead leaves at their base, and snip spent flowers when the plant has finished blooming. Use clean, sharp scissors and avoid removing more than roughly one-third of the plant at once. Light shaping after flowering is safer than a hard cut when you're still learning how that plant responds.
If a healthy stem breaks, place the trimming in water or suitable propagation mix if the plant is known to root readily. The process turns routine tidying into a small extra plant without adding much work.
Spotting Pests and Fixing Common Problems
Outdoor pots occasionally attract pests or develop stress symptoms. That doesn't mean you have a black thumb. Start with a calm sequence: isolate the affected pot, identify the pattern, treat gently, and return to normal care once the cause is addressed.
Aphids often cluster on tender growth and flower stems. Begin with a firm spray of water, taking care not to damage delicate leaves. Spider mites prefer hot, dry conditions and may leave fine webbing or stippled foliage. Rinsing the plant and using insecticidal soap or neem oil according to the product label can be a first response. For a broader visual reference, see this guide to common garden pests.
Fungus gnats are small flying insects associated with persistently damp mix. Let the soil surface dry between waterings and use sticky traps to catch adults. Powdery mildew appears as a pale, dusty coating. Improve airflow, avoid wetting leaves, and remove badly affected foliage with clean snips.
Read yellow leaves before reacting
Yellow leaves don't point to one single cause. Check the soil first:
- Wet mix and widespread yellowing: The plant may be receiving too much water or draining poorly.
- Very dry mix and limp growth: The plant may be short of moisture.
- Yellowing with generally weak growth: Nutrition or unsuitable light may be contributing.
- Dark, soft roots or a sour-smelling mix: Root damage is possible, especially when water remains trapped.
Root rot needs a structural fix, not another watering product. Inspect the drainage, remove damaged roots if repotting is appropriate, and use fresh airy mix. Don't treat every yellow leaf as an emergency. Older leaves naturally decline, and a single imperfect leaf is often just part of normal growth.
Travel Heat Waves and Hands-Off Care
You're packing for a Friday trip when you notice the patio pots. The forecast looks hot, your smallest containers already feel light, and you don't want to ask a neighbor to guess which plant needs what. Prepare the collection before leaving instead of trying to rescue it at the last minute.
Prepare the pots before departure
About 48 hours before leaving, inspect each container rather than watering everything automatically. Water plants whose upper mix is dry, allowing the root ball to become fully moist and the pot to drain. Move fragile or shade-loving plants away from harsh afternoon exposure, group containers together to create a more sheltered, humid pocket, and add a light mulch layer to slow evaporation.
A weekend trip usually calls for preparation and a return check. Plants in large containers, sheltered locations, or naturally drought-tolerant groups may manage with less intervention. Small pots in full sun, flowering plants, and anything already stressed deserve more careful planning.
For a longer vacation, use a plant-sitter or a tested irrigation method. A self-watering globe can supplement moisture, but don't install it for the first time as you walk out the door. Try it while you're home, observe how quickly the reservoir empties, and adjust the angle or flow if the soil becomes saturated.
Match the globe to the planter rather than the plant label alone. A smaller globe is more appropriate for a small pot with limited mix, while a larger reservoir may be useful for a medium planter that dries quickly. Terracotta often needs closer monitoring because the pot itself allows moisture to escape, while plastic may hold moisture longer. These are starting points, not guarantees. Sun, wind, soil texture, plant size, and temperature still determine the actual refill rhythm.
Little Green Leaf offers hand-blown glass watering globes in 100 mL, 200 mL, and 350 mL sizes, designed to release water gradually as the soil dries. The globes don't use timers, batteries, or apps, and optional tip covers and adapters can help with flow and insertion. Choose an option as a supplement to soil checks, not as permission to ignore drainage.
Add a heatwave plan
During extreme heat, small outdoor pots may need watering daily or even twice daily when temperatures exceed 85°F, or 29°C, according to this summer container watering guidance. Don't respond by flooding the container. Check the mix several inches down when the surface is misleading, water slowly into the soil, and stop once the root ball is saturated and drainage begins.
Shade cloth can protect delicate plants during the hottest period. If a saucer is needed on a balcony or patio, refill it only as part of a deliberate moisture routine and empty standing water within 60 minutes, following extension guidance. A saucer isn't a substitute for watering the root ball.
When you return to a heat-stressed plant, move it into gentler light, check the soil, and water thoroughly if the mix is dry. Don't drown it repeatedly or fertilize immediately. Give the roots time to rehydrate, remove badly damaged leaves, and resume ordinary care once the plant stabilizes.
Keep a routine you can repeat
Pin this short cadence to the fridge:
- Finger-test the soil: Check the upper mix before watering.
- Rotate the pot: Turn it a quarter turn so growth stays even.
- Check the saucer: Empty collected water after drainage.
- Scan the leaves: Look for pests, mildew, yellowing, or heat stress.
In spring, increase attention as new growth begins and feed only when the plant is actively growing. In summer, check more frequently and adjust for sun and wind. In fall, taper feeding and reduce watering as conditions cool. In winter, protect containers from harsh exposure, water less often when the mix stays moist, and avoid pruning dormant plants unless damaged growth needs removal.
Outdoor container plants often need more frequent watering than plants in the ground because their available water and nutrient reservoir is smaller. Research on container plant water needs explains this basic difference, which is why pot size and placement matter so much.
Missing a check isn't a disaster. A few consistent observations will help more than occasional heroic rescue efforts. Bookmark this guide, keep your watering tool nearby, and let your plants teach you their rhythm over the seasons.
Little Green Leaf offers decorative self-watering globes that can support outdoor potted plants when your schedule is busy or you're away. Visit Little Green Leaf to explore hand-blown glass options for your container care routine.