
How to Use Watering Globes: A Simple Guide for Happy Plants
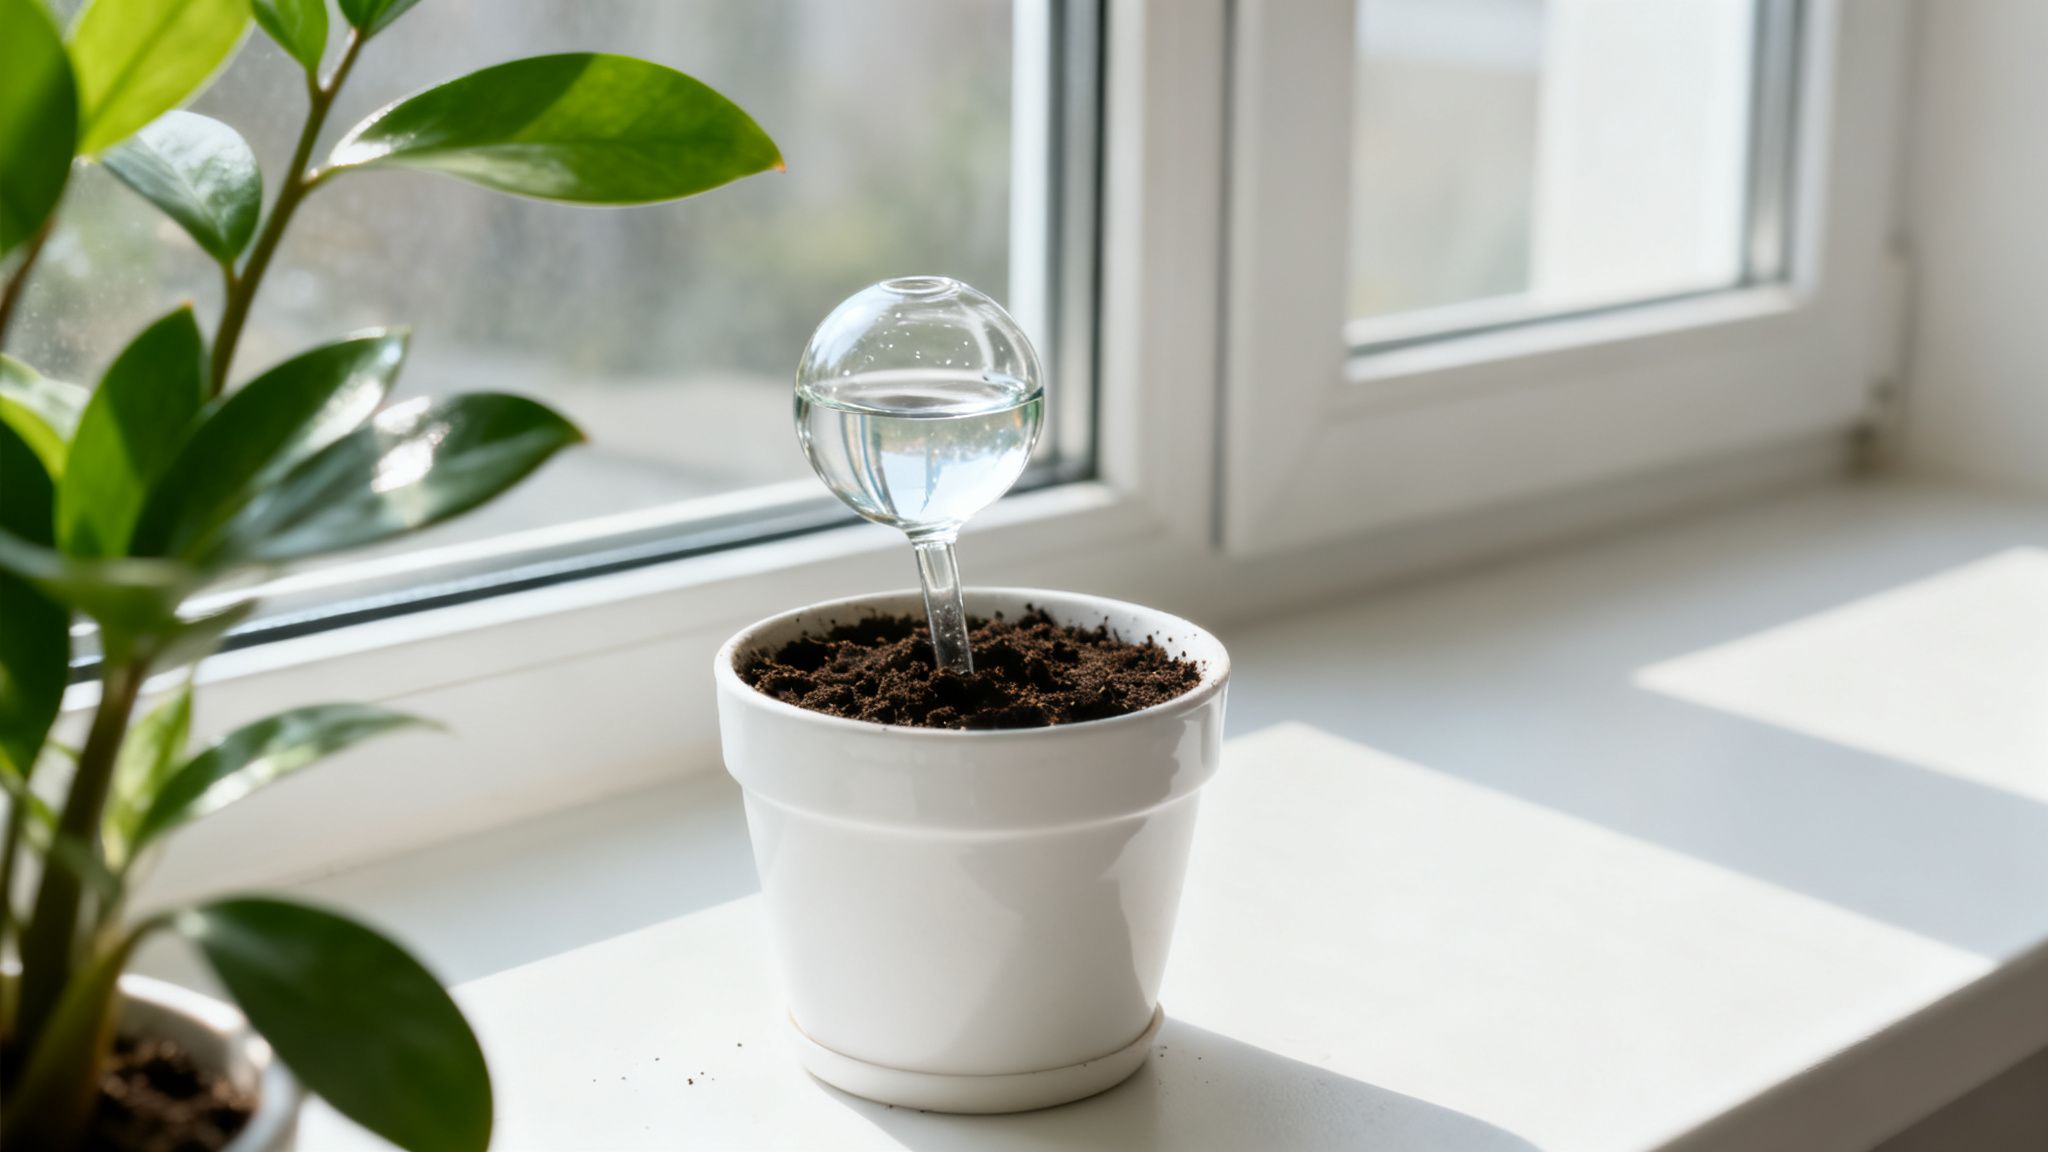
Using a watering globe is beautifully simple: just fill the globe with water and gently place its stem into your plant's soil. As the soil dries, the globe slowly releases water right where it's needed—at the roots. It’s a gentle tool that helps take the guesswork out of your watering routine.
A Simple Way to Keep Your Plants Consistently Watered
Imagine your plants staying happily hydrated without you having to worry about them every day. That's the simple promise of a watering globe. This guide is for anyone who loves their green friends but feels that common uncertainty about over or under-watering, especially when life gets busy.
These elegant tools work by slowly releasing water only when the soil becomes dry, creating a more natural and consistent hydration cycle. Think of it as giving your plant a drink exactly when it asks for one.
This gentle approach is a wonderful companion for:
-
Busy People: Juggling work, family, and everything else leaves little room for a rigid watering schedule.
-
Frequent Travelers: You can leave for a long weekend feeling confident that your plants are being cared for.
-
New Plant Owners: Globes offer a forgiving way to learn about your new plant's unique needs.
Using watering globes can make your plant care feel less like a chore and more like a joy, helping you build confidence as a plant parent.
The Science Behind the Simplicity
How does a watering globe work its quiet magic? It’s all about a simple exchange of water and air. When you place a filled globe into moist soil, the soil creates a temporary seal around the stem. As your plant drinks and the soil begins to dry, tiny air pockets form.
This air travels up into the globe's stem, releasing a small amount of water that then seeps out to rehydrate the soil. Once the soil is moist enough to close those air pockets, the flow stops. It's a completely automatic process that ensures your plant gets water only when it's actually thirsty.
Key Takeaway: A watering globe isn't a timer; it’s a responsive tool. It works with your plant, delivering water based on the soil's real-time moisture level.
A Growing Trend in Modern Plant Care
If you're looking for simpler ways to care for your green companions, you're in good company. The global market for plant watering globes has seen steady growth, valued at roughly $512 million in 2024 and projected to hit $1.09 billion by 2033.
This isn't just a fleeting trend. It shows a real shift toward low-maintenance solutions for urban gardeners, apartment dwellers, and anyone trying to bring a bit of nature indoors without adding more stress to their lives. You can dive deeper into the market trends for these helpful tools to see just how popular they've become.
Choosing the Right Watering Globe for Your Plant
Finding the perfect watering globe is less about strict rules and more about understanding your plant's personality. Think of it like picking out a cozy sweater—you want a fit that’s just right. The goal is to find a globe that provides consistent moisture without overwhelming the roots, making your life a little easier.
It’s a choice more and more plant lovers are making. The global gardening market is growing, expected to jump from $120 billion in 2024 to $150 billion by 2030, and helpful tools like watering globes are a big reason why. They’re a wonderful support for apartment dwellers, busy professionals, and travelers who need a reliable, low-effort way to keep their plants happy. You can explore the trends shaping the modern gardening market to see how simple solutions are making such a positive impact.
Matching Globe Size to Your Plant Pot
The most important factor is pairing the size of the globe to the size of the pot. A tiny globe in a huge pot will empty quickly, which isn’t very helpful. On the other hand, a very large globe in a small pot can take up precious root space. It’s all about finding that happy medium.
A good rule of thumb is to look at your pot’s diameter.
Here's a simple guide to get you started on matching your plant's pot size with the right watering globe for happy, gentle hydration.
Watering Globe Sizing Guide
| Globe Size | Best for Pot Diameter | Ideal for Plant Types | Estimated Duration |
|---|---|---|---|
| Small (around 100 ml) | 4 to 6 inches | Succulents, small Pothos, kitchen herbs | 7-10 days |
| Medium (around 200 ml) | 6 to 8 inches | Snake plants, ZZ plants, maturing Monsteras | 1-2 weeks |
| Large (350 ml and up) | 8+ inches | Fiddle Leaf Figs, large Birds of Paradise | Up to 2+ weeks |
This matching process is your best bet for ensuring your plant gets a steady, gentle supply of water for days—or even weeks—at a time.
A Quick Tip: If you have a very large planter (think 12 inches or more) and a thirsty plant, you can try using two medium-sized globes. Just place them on opposite sides of the pot to make sure the moisture is distributed evenly.
Considering Your Plant’s Thirst Level
Beyond pot size, just think about your plant’s natural habits. Not every plant drinks at the same pace. A lush, tropical calathea or a fern, for example, loves to stay consistently moist and will draw water from a globe more often. These are wonderful candidates for a self-watering system.
Then you have succulents and cacti, which prefer their soil to dry out completely between waterings. You can still use a globe for these drought-tolerant friends, but you’ll use it a bit differently. Let the globe empty, then wait until the soil is fully dry before you fill it up and place it back in. This way, the globe becomes a convenient reservoir for its next deep watering, not a constant source of moisture.
Adding a Touch of Personal Style
Functionality is key, but the fun part is picking a design that makes you smile. Watering globes aren't just plain glass bulbs anymore; they've become beautiful little decorative accents for your plants.
Whether you're drawn to the minimalist feel of clear, hand-blown glass or prefer a playful, whimsical mushroom shape, there’s a style out there for you. We’ve put together a collection of beautiful and functional watering globes that can help you find a piece that feels like a natural part of your home. When you choose a design you love, a simple plant care tool becomes a small piece of art.
How to Set Up Your Globe for Success
You've picked out the perfect watering globe. Now for the fun part: introducing it to your plant. Getting this initial setup right is what helps these little tools work their magic, giving your plant that consistent hydration it loves.
Think of it as a smooth, simple handshake between your plant and its new friend. We'll walk through it step-by-step.
The whole point is to make this feel natural and simple. With just a few gentle moves, you’ll have your globe set up and ready to go.
Start With the Soil
Before you do anything else, give your plant a good watering. This may sound a little backward, but it's the most important step for achieving that slow, steady release.
When the soil is already moist, it forms a nice, snug seal around the globe’s stem. That seal is what prevents the water from flowing out all at once. If you place a globe into very dry soil, the soil will absorb all the water in a day or two, and you’ll wonder why it didn’t last.
A well-watered plant is a patient plant. By watering thoroughly first, you're setting the stage for the globe to release moisture slowly and steadily, just as nature intended.
Make a Path First
Next, you want to avoid getting soil stuck inside the globe's stem, as this can cause a clog. So instead of pushing the globe directly into the dirt, it's helpful to create a little pilot hole first.
A chopstick, a pencil, or even your finger will do the trick. Gently poke a narrow hole into the soil right where you plan to place the globe. This one simple move helps ensure a clear pathway for the water and can save you from frustration later.
Fill It Up
Time to fill your globe. Just hold it under a gentle stream from the tap. Tilt it a little as it fills—this lets the air escape as the water flows in. You don't need to fill it to the very top; leaving a small air pocket actually helps the water flow more smoothly.
Once it's mostly full, place your thumb over the opening of the stem. This is a helpful trick to prevent drips while you carry it over to your plant and turn it upside down.
Choosing the right watering globe in the first place is just as important, and it really comes down to your pot size, plant type, and personal style.
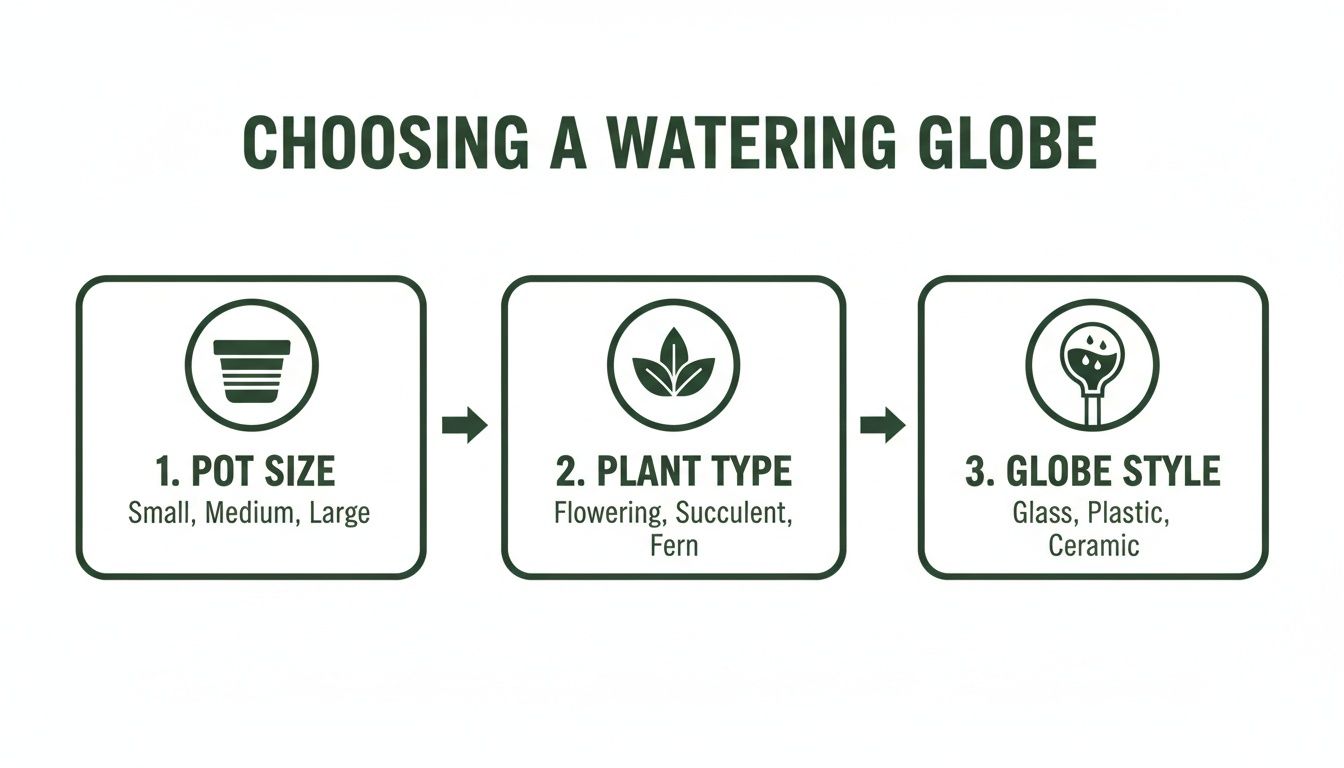
As you can see, it's a simple process: check the pot, know your plant's needs, and then pick a style that makes you happy.
Insert at a Slight Angle
With your pathway cleared and your globe filled, you're ready for the final step. Quickly and confidently, turn the globe over and slide the stem into the hole you made. Push it down firmly so it feels stable.
Here's a tip: try inserting it at a slight angle instead of perfectly straight up and down. This can help regulate the airflow, leading to a more consistent, gradual release of water. You'll want to aim the globe toward the root ball but not directly on top of the main stem. This gives the roots easy access to moisture.
The whole goal here is to create a happy little system where your plant gets exactly what it needs, when it needs it. To make things even easier, the Little Green Leaf collection has options that come with accessories designed to help prevent clogs and improve water flow. Having the right tools can make all the difference. You can explore different styles and accessories for your plants to find the perfect fit for your home.
And just like that, you're done! Your self-watering system is officially on duty and will keep your plant happy for days, or even weeks. Now you can sit back, relax, and enjoy watching it thrive.
Long-Term Care and Simple Maintenance
Once your watering globe is in place, the hard part is over. Keeping it working isn't about adding another chore to your list; it's about settling into a simple rhythm that helps your plants thrive with less guesswork.
Think of it less as a task and more as a quiet partnership. A quick peek every few days is all it takes to see what your plant needs and when it's time for a top-up.
This isn’t about obligation—it’s about observation. Soon you’ll get a feel for how your plant uses water, and refills will become second nature.
Finding Your Plant’s Rhythm for Refills
The best part about watering globes is that there's no strict schedule. How often you refill depends entirely on your plant's needs, which can change with the seasons or even the weather.
You'll start to notice a few things influence how quickly the globe empties:
-
The Season: Plants are often thirstier in the spring and summer when they're actively growing. In fall and winter, they tend to slow down and drink less.
-
Your Home's Humidity: Dry air from heating in the winter or air conditioning in the summer can dry out soil faster. A plant in a humid bathroom, on the other hand, will make its globe last much longer.
-
Plant Growth: As your plant gets bigger, it will naturally need more water. A globe that used to last two weeks might need a refill after ten days as your plant puts out new leaves.
Just check the water level every few days when you first start. You’ll quickly learn the individual pace of each plant, and checking will become a quick, intuitive habit.
Your watering globe is a wonderful communication tool. Watching how fast it empties gives you a direct line to your plant's needs, helping you become a more in-tune and confident plant parent.
Keeping Your Globes Clean and Clear
Every now and then, you might notice a bit of soil residue or mineral buildup inside your globe. Keeping it clean is incredibly easy and ensures water can flow freely to your plant's roots. A quick rinse every month or two is usually all you need.
For a deeper clean, it only takes a minute:
-
First, fill the globe with warm water and a drop of dish soap. Let it soak for about ten minutes to loosen any residue.
-
Next, cover the opening and give it a gentle shake to dislodge any stuck-on bits.
-
For any stubborn spots inside the stem, a small bottle brush or a pipe cleaner works perfectly. A gentle scrub is all it takes.
-
Finally, rinse it thoroughly with clean water until all the soap is gone. Let it air dry before putting it back to work.
This little bit of upkeep ensures your beautiful globes stay clear and elegant while doing their job perfectly. This simple routine is just one more reason learning how to use watering globes can make your plant care feel more peaceful and less like a chore.
Solving Common Watering Globe Puzzles
Every plant parent runs into a few questions along the way, and using watering globes is no different. It helps to think of these moments not as problems, but as your plant's way of communicating with you. This section is your guide to understanding those little puzzles and making small, confident tweaks for happy, hydrated plants.
Most of the time, the fix is surprisingly simple. You’ll quickly learn to read the subtle cues from your plant and its new watering buddy.
Why Did My Globe Empty So Fast?
You’ve set up your new globe, and just a day or two later, it’s empty. This is the most common thing new users see, and it almost always points to one simple reason: the soil was too dry to begin with.
When you place a globe into thirsty soil, the soil acts like a sponge and absorbs all the water at once. It doesn't get a chance to create the gentle seal that's key to the slow-release system.
Another possibility is your soil type. Very porous or sandy mixes let water drain through more quickly. These soils don't pack as tightly around the globe's stem, leading to a faster flow.
What to Do When the Globe Drains Too Quickly
If your globe is emptying faster than you’d like, a few simple adjustments usually do the trick. You'll find a rhythm that works for your specific plant and its environment in no time.
-
Water Thoroughly First: The easiest fix is usually the best one. Always give your plant a good, deep watering before you put the globe in. This makes sure the soil is already moist and can form that crucial seal for a slow, steady release.
-
Check Your Insertion Angle: Try pushing the globe in at a slight angle instead of straight down. This can help regulate the airflow a bit and slow down the water delivery. It’s worth experimenting to see what works best.
-
Compact the Soil Gently: After the globe is in place, press down lightly on the soil around the stem. This helps create a tighter seal, especially in looser soil, and encourages water to release more slowly.
These tiny tweaks can make a big difference, turning a one-day wonder into a week-long hydration helper.
Sometimes, a fast-emptying globe is just your plant telling you it was very thirsty. After that initial quick drink, the next refill will likely last much longer once the soil moisture has stabilized.
Why Isn't My Globe Draining At All?
On the other hand, you might notice the water level in your globe hasn't moved for days. While it could just mean your plant is perfectly happy and the soil is moist, it often signals a small clog in the stem.
This usually happens when a bit of soil gets pushed up into the narrow opening during insertion. It creates a little plug that stops water from flowing out. Don't worry—it’s an easy fix and totally preventable once you know the trick.
How to Fix a Clogged Globe
Getting your globe flowing again is simple, and a little blockage won't harm your plant.
First, just gently pull the globe out of the pot. A quick rinse under the faucet will usually clear the soil plug. For a stubborn clog, a pipe cleaner or a small bottle brush will clear the stem in seconds.
To keep it from happening again, always create a pilot hole in the soil before inserting the globe. Use a pencil or a chopstick to make a clear path, which helps ensure no soil gets stuck in the stem. For plants in very fine, dense soil, you can even wrap a tiny piece of porous fabric or a cotton ball around the tip before you push it in. This acts as a filter, keeping the pathway clear.
Quick Troubleshooting Guide
Here's a handy reference to help you diagnose and solve common questions with your watering globes.
| What You See | What It Might Mean | A Simple Fix |
|---|---|---|
| Globe empties in 1-2 days. | The soil was likely too dry when the globe was inserted, or the soil is very porous. | Water the plant thoroughly before inserting the globe. Try compacting the soil around the stem. |
| Water level hasn't moved. | The stem is likely clogged with soil, or the soil is already fully moist. | Remove the globe, clean the stem, and re-insert it into a pre-made pilot hole. |
| Water bubbles out rapidly. | The seal between the soil and the stem isn't tight enough, often due to an air pocket. | Remove the globe, re-water the area, and re-insert the globe at a slight angle, pressing soil firmly around it. |
With these tips, you'll be able to read your plant's needs and keep your watering globes working beautifully.
Frequently Asked Questions About Watering Globes
Once you start using your new watering globes, you'll probably have a few questions. It's all part of the process! We've gathered some of the most common ones we hear from fellow plant lovers to help you get the hang of things even faster.
Think of it this way: every plant has its own personality, and learning what it likes is half the fun. These answers should help you and your green friends get the most out of your globes.
How Long Will My Watering Globe Last Before a Refill?
This is the number one question we get, and the honest answer is: it depends! This isn't a design flaw; it's the globe responding to your plant's specific needs in real-time.
A small globe in a pot of succulents might last well over a week, while a larger globe in a thirsty fern could be empty in just four to seven days.
A few things influence the timing:
-
Plant Size: A big, leafy monstera will drink more water than a small pothos.
-
Soil Type: Airy, loose soil lets water flow more easily than dense, compacted soil.
-
Your Home's Environment: Is the plant in a warm, sunny window? Is the air dry from your furnace? Both will make the soil dry out faster, which means the globe will release water more often.
Our best advice? When you first start, just peek at the water level every few days. You’ll quickly get a feel for your plant's unique rhythm.
Are Watering Globes Good for All Types of Plants?
Absolutely! They're incredibly versatile and work for just about any houseplant, as long as you adjust your approach slightly.
Globes are a dream for plants that love consistently moist soil—think ferns, calatheas, and peace lilies. They provide that steady hydration these tropical beauties thrive on.
But what about succulents, cacti, or snake plants that need to dry out completely? You can still use a globe! The trick is to change how you use it. Let the globe empty completely, and then wait several more days for the soil to dry out before you refill it. In this case, the globe becomes less of a constant sipper and more of a convenient way to give a deep, thorough watering when the time is right.
A Gentle Reminder: A watering globe is a fantastic tool to help with your watering routine, but it doesn't replace it entirely. You'll still want to check in on your plants and enjoy that connection. It's one of the best parts of being a plant parent!
Can I Put Fertilizer or Plant Food in My Globe?
We get this question a lot, and we recommend sticking with plain water only.
While it seems like a clever shortcut to combine feeding and watering, adding liquid fertilizer can cause a couple of problems. The nutrients can sometimes clog the narrow stem, stopping the water flow. More importantly, the fertilizer can become too concentrated in one spot, which could potentially harm delicate roots.
It's much safer to continue your regular fertilizing schedule separately. Just add it during a normal watering every few weeks. This ensures the nutrients get distributed evenly throughout the pot and lets the globe do what it does best: provide pure, simple hydration.
How Do I Keep Soil from Clogging the Stem?
Great question. A clogged stem is the most common reason a globe stops working, but thankfully, it's also the easiest to prevent.
The best trick is to create a small pilot hole in the soil before you push the globe in. Use a pencil, a chopstick, or even your finger to poke a hole right where you want the stem to go. This clears a path so soil doesn't get pushed up inside as you insert it.
For plants with really fine or dense soil, you can add another layer of protection. Try wrapping a tiny piece of cotton or a scrap of porous fabric around the tip of the stem. This acts as a little filter, keeping the opening clear and the water flowing smoothly. If you ever run into a tricky situation or have more questions, please feel free to reach out to our team for some one-on-one advice.
Ready to bring this effortless, beautiful watering solution to your own green companions? The Little Green Leaf collection offers a variety of handcrafted glass globes designed to make plant care simpler and more joyful. Explore our styles and find the perfect match for your plants today.
Refined using Outrank tool