

Brown Leaf Tips on Plants: What They Mean and How to Fix
You notice it while watering: one otherwise healthy leaf has a crisp brown tip, and suddenly you're wondering whether you've neglected the whole plant. Brown leaf tips on plants usually aren't a death sentence. They're more often a quiet record of changing conditions, such as dry air, uneven watering, fertilizer salts, or water quality.
The useful part is that the damage itself gives you clues. Its color, texture, location, and relationship to the surrounding leaf can help you choose a sensible fix instead of changing everything at once. With a calm inspection and a steadier routine, most beginners can narrow down the likely cause without treating the plant like an emergency.
When Brown Tips First Show Up and What They're Telling You
A plant owner might first notice the problem on a slow morning, perhaps while opening the curtains or clearing a few fallen leaves. The plant still looks full and green, but the end of one long leaf has turned the color of toast. It's easy to feel a small wave of guilt, especially if the plant has been forgotten during travel or a busy week.
Try to see that mark as a message rather than a failure. A brown tip is finished tissue, but it often reflects conditions the leaf experienced over time. The plant may be telling you that the air has been too dry, the soil has swung between very dry and very wet, or minerals have accumulated around the roots. Iowa State University Extension identifies low humidity as the most likely cause of brown houseplant tips and edges, while also noting inconsistent watering, excess fertilizer salts, chlorine, and fluoride as possible triggers.
Start with the plant, not the panic
Certain plants make this signal especially easy to spot. Spider plants, ti plants, dracaenas, prayer plants, and calatheas can be sensitive to environmental changes, so their long, narrow or richly patterned leaves may show browning before the rest of the plant looks troubled. Peace lilies can also make the change visually obvious because their broad leaves display dry edges clearly.
The location matters too. A sharp brown point at the end of a leaf tells a different story from a soft dark patch in the middle. Browning that appears on several plants near a heater may suggest a room condition, while one affected plant may point toward its individual watering, feeding, or root-zone history.
A brown tip can't become green again, so trimming may improve the appearance, but the more important question is whether new growth continues cleanly. If you're also seeing mushy stems, a sour smell, or leaves collapsing from the base, compare the symptoms with this guide to signs of root rot in plants. Otherwise, take a breath and read the leaf as a clue. The next step is a simple visual decoding routine you can repeat whenever another mark appears.
How to Read Your Plant's Damage Like a Detective
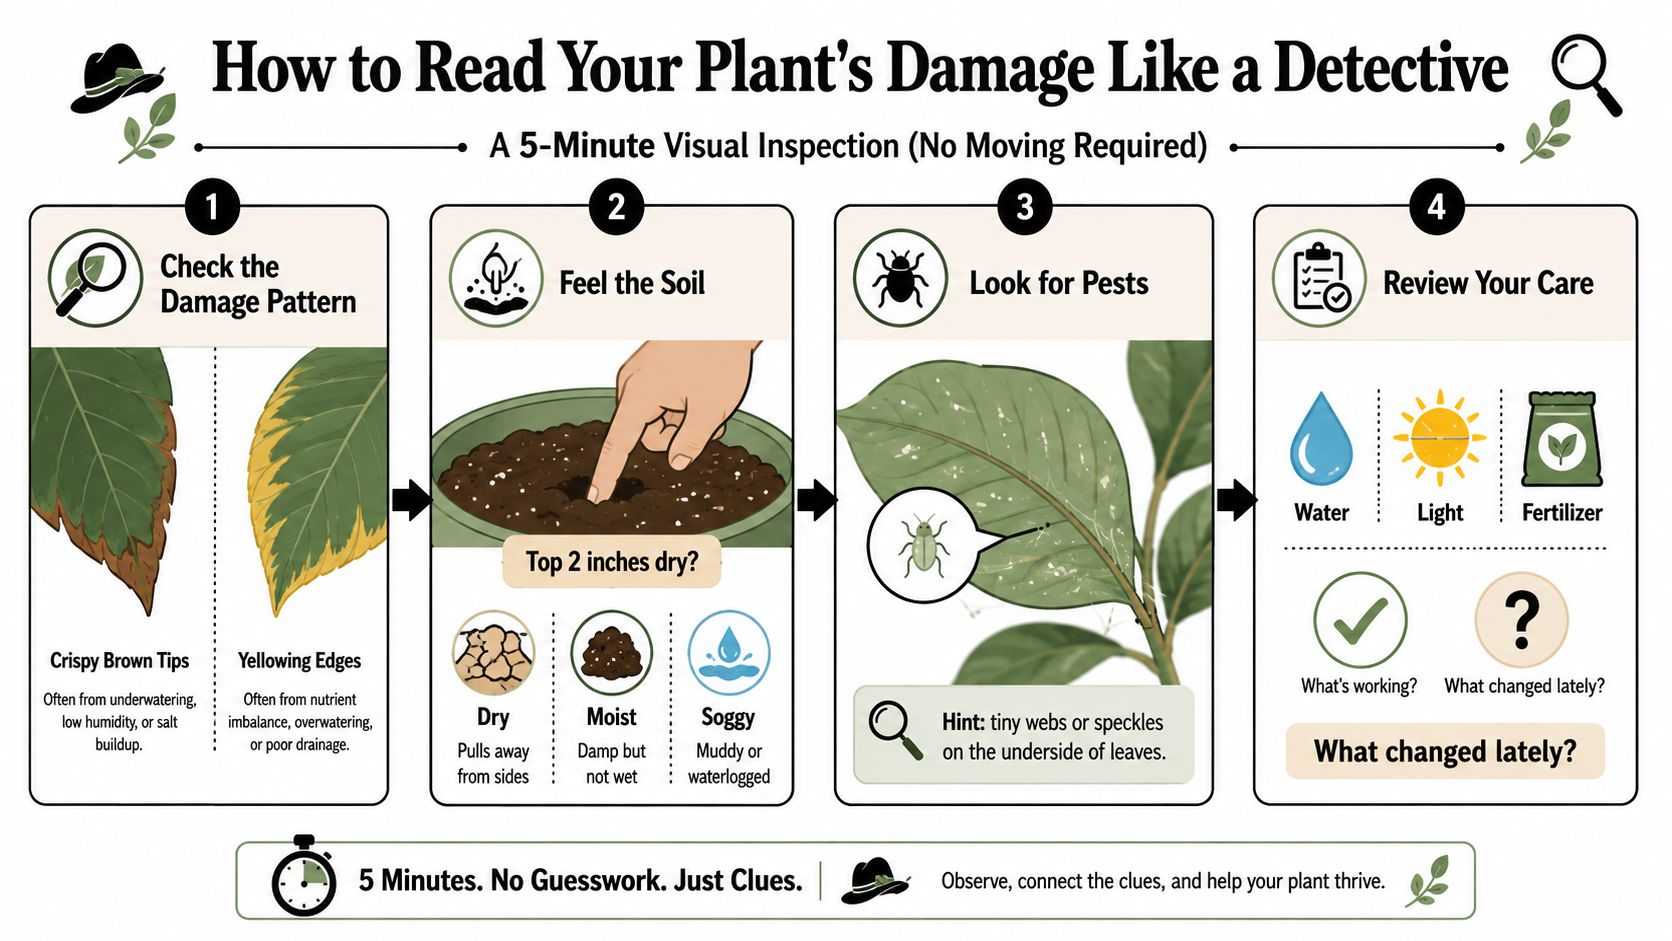
You don't need to move the pot or buy a collection of gadgets. Spend a few quiet minutes examining four clues in the same order each time: the damage pattern, the soil, the watering history, and recent feeding or repotting.
Start with the shape of the mark
Look closely at the boundary between healthy and damaged tissue.
- Crisp, isolated tips: A clean brown point often fits dry air, watering stress, or salt accumulation.
- Yellow around the brown: A yellow halo raises the possibility of fluoride or salt toxicity.
- Browning along the margin: Edge damage can reflect environmental dryness, chemical stress, or an uneven water supply.
- Dark patches in the leaf center: This pattern deserves a wider check of watering, light, and root health rather than an automatic tip-burn diagnosis.
The distinction is useful because University of Connecticut guidance on common houseplant problems describes a crisp brown tip with a clean boundary as more consistent with desiccation or mineral stress, while a yellow halo more strongly suggests chemical toxicity.
Feel the soil below the surface
Push a finger or a chopstick into the potting mix, checking roughly 2 inches below the surface. The top can look dry while the root zone remains moist, especially in a deep container. A moisture meter can help, but your finger and the weight of the pot are often enough for a beginner.
Lift the pot before and after watering when you can. A surprisingly light container supports the possibility of dryness; a heavy pot that stays wet for a long time suggests you should pause before adding more water. If you want a clearer routine for judging moisture, use this guide to tell if soil is dry.
Reconstruct the recent care
Ask when you last watered, whether the water ran through the drainage holes, and whether the plant recently went from bone dry to thoroughly soaked. Then check your feeding record. A recent strong application of fertilizer can leave a salt fingerprint on leaf tips, while repotting can disturb roots and temporarily alter water uptake.
Practical rule: Read the leaf first, check moisture second, then change one variable at a time.
Your decision tree is simple. The pattern suggests the category, the soil tells you whether dryness or saturation is present, and your recent care explains what changed. Feeding and water-source history help confirm whether minerals are part of the picture.
The Four Everyday Triggers Behind Brown Leaf Tips
Most brown tips come from a small group of environmental stresses rather than a single disease. Iowa State University Extension describes low humidity as the most common cause, and its houseplant guidance also connects tip browning with uneven watering, fertilizer salts, and water chemicals such as chlorine and fluoride. Horticultural research shows that leaf-tip burn can also be a physiological disorder involving nutrient balance, including calcium, potassium, and boron, as well as toxicity from boron or fluoride. The peer-reviewed research on tip burn and leaf-margin injury helps explain why the same visual symptom can have different sources.
Watering swings
When soil dries too far and then receives a sudden heavy soak, roots experience alternating stress rather than a stable supply. Tips may become crisp and light brown, especially when the plant has repeatedly been left dry for too long. A plant that improves after a deep watering but develops new browning during the next dry spell may be asking for a more predictable rhythm, not more water every day.
Low humidity
Dry indoor air can pull moisture from leaf edges faster than the plant can replace it. The tips may look papery, faded, or lightly bleached, with the problem appearing on plants close to radiators, heating vents, air-conditioning drafts, or a cold window. RHS guidance links brown tips and margins with a dry atmosphere, and Iowa State notes that indoor humidity is often particularly low in winter.
Fertilizer salts
Excess fertilizer can leave soluble salts in the potting mix. The tips may turn deep brown or nearly black, and a pale crust can appear on the soil surface or around the pot rim. More fertilizer won't correct this pattern. It can increase the salt load and keep the plant in the same cycle, so review the label and your recent applications before feeding again. A gentler approach to plant nutrition is outlined in this guide to organic fertilizer for plants.
Water quality
Chlorine, fluoride, sodium, and other dissolved minerals can accumulate in the root zone or concentrate at leaf tips. The damage may develop slowly and leave a rust-colored or reddish-brown edge, particularly on sensitive plants such as spider plants, ti plants, dracaenas, prayer plants, and calatheas. Fluoride toxicity can produce a distinct reddish-brown line at the damaged edge, according to the research linked above.
Apartment owners may also notice plant stress alongside condensation or damp indoor surfaces. If your home has moisture problems as well as dry plant tips, this resource on ceiling moisture prevention can help separate household humidity concerns from plant-specific care.
| Trigger | Tip appearance | Most affected plants | Quick clue |
|---|---|---|---|
| Watering swings | Crisp, light brown ends | Plants left dry for long periods | The soil repeatedly shifts from very dry to saturated |
| Low humidity | Papery, pale or bleached tips | Plants near heaters or drafts | Several nearby plants show similar dry edges |
| Fertilizer salts | Dark brown to almost black tissue | Salt-sensitive houseplants | White crust appears on the mix or pot |
| Water quality | Rust-colored or reddish-brown margins | Spider plants, dracaenas, prayer plants, and calatheas | Browning builds gradually despite regular watering |
Match the pattern before making a change. The clean boundary, yellow halo, soil condition, and recent care history together are more useful than the brown color alone.
Calm Recovery Steps That Bring Leaves Back to Life
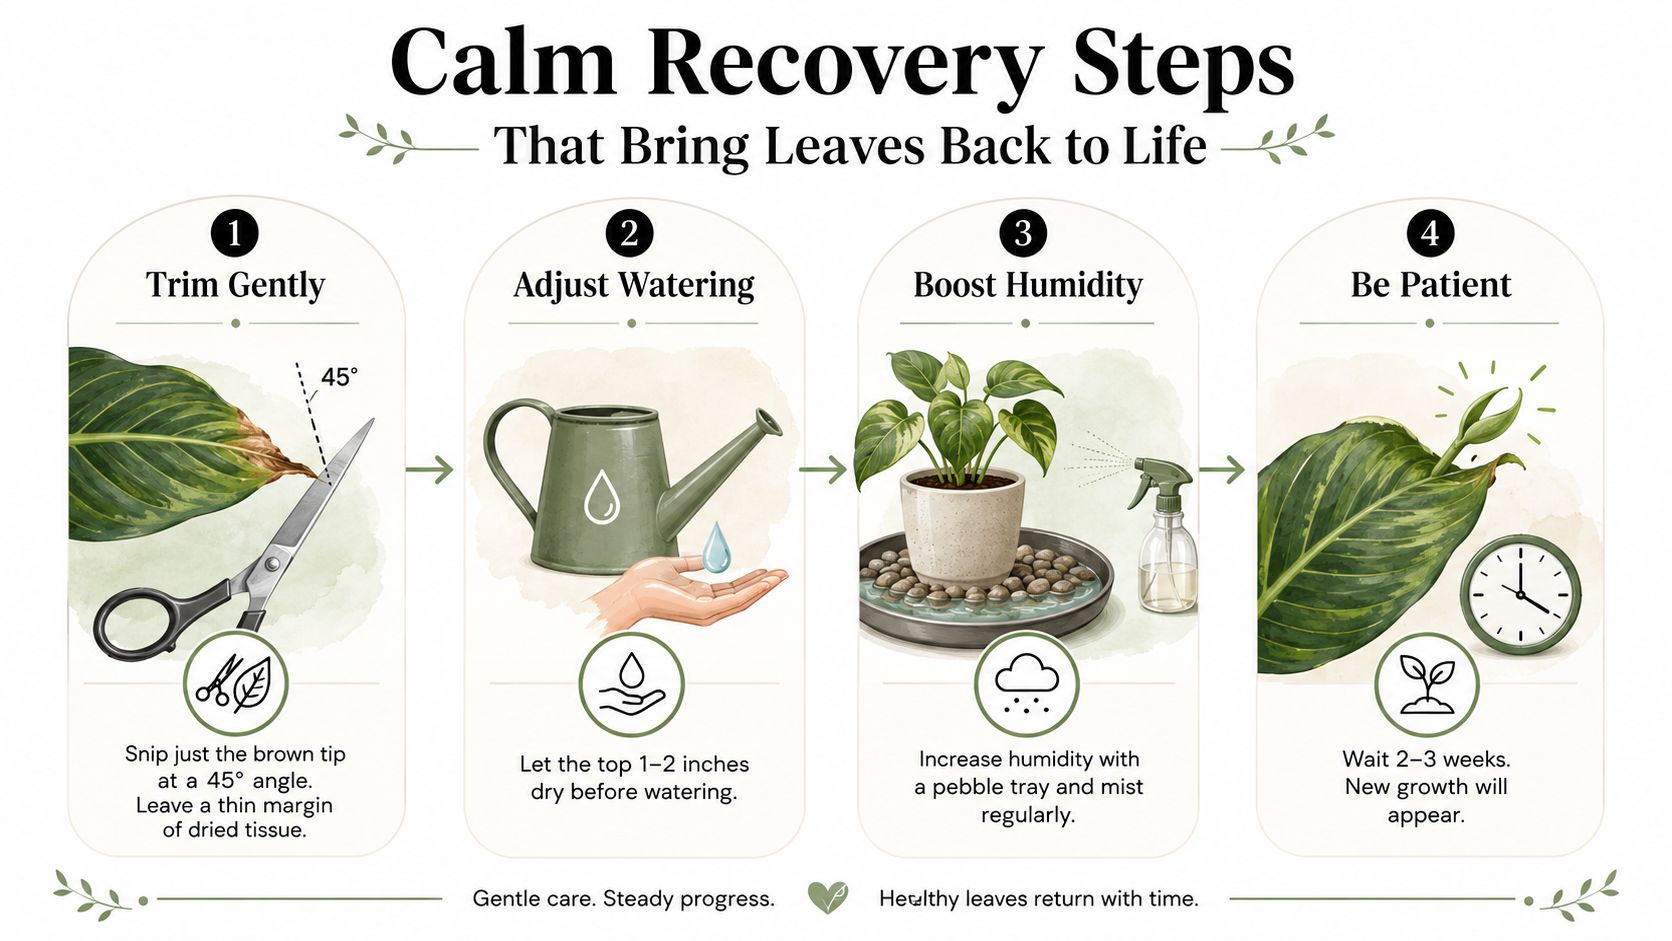
Recovery doesn't require emergency surgery. Think of it as removing pressure from the plant and giving the roots a steadier environment.
Begin with clean, sharp scissors. Trim only the dry tissue, following the natural angle of the leaf and leaving a very small margin rather than cutting into healthy green tissue. If several leaves are affected, clean the blades between plants so you aren't carrying debris from one pot to another.
Restore moisture without creating a new problem
If the root zone is dry, water thoroughly until excess drains from the pot. A bottom soak can help rehydrate mix that has pulled away from the sides, but don't leave the pot standing in water afterward. If the mix is holding fertilizer salts, flush it with plain, room-temperature water so the drainage carries some of that buildup away from the roots.
If you suspect the water source, change that exposure first. A lower-salt source may be appropriate for sensitive plants, but avoid making several changes in the same afternoon. When you alter watering, water quality, light, and fertilizer all at once, you lose the clues that would tell you which adjustment helped.
Soften the room conditions
Move the plant away from harsh direct sun, heating vents, air-conditioning drafts, and unstable temperature pockets. Choose stable, filtered light instead of placing a stressed plant in a bright but hot window.
For dry air, try grouping plants, using a pebble tray with water below the pot, or running a humidifier. Misting can provide a brief surface refresh, but it won't replace a consistently suitable room environment. Pause fertilizer while you diagnose the issue. Once healthy new growth appears, resume cautiously and use half strength rather than trying to compensate for old damage.
The existing brown tissue will stay brown. Judge progress by the condition of new leaves and by whether the browning stops spreading.
A Steady Care Rhythm That Prevents Brown Tips
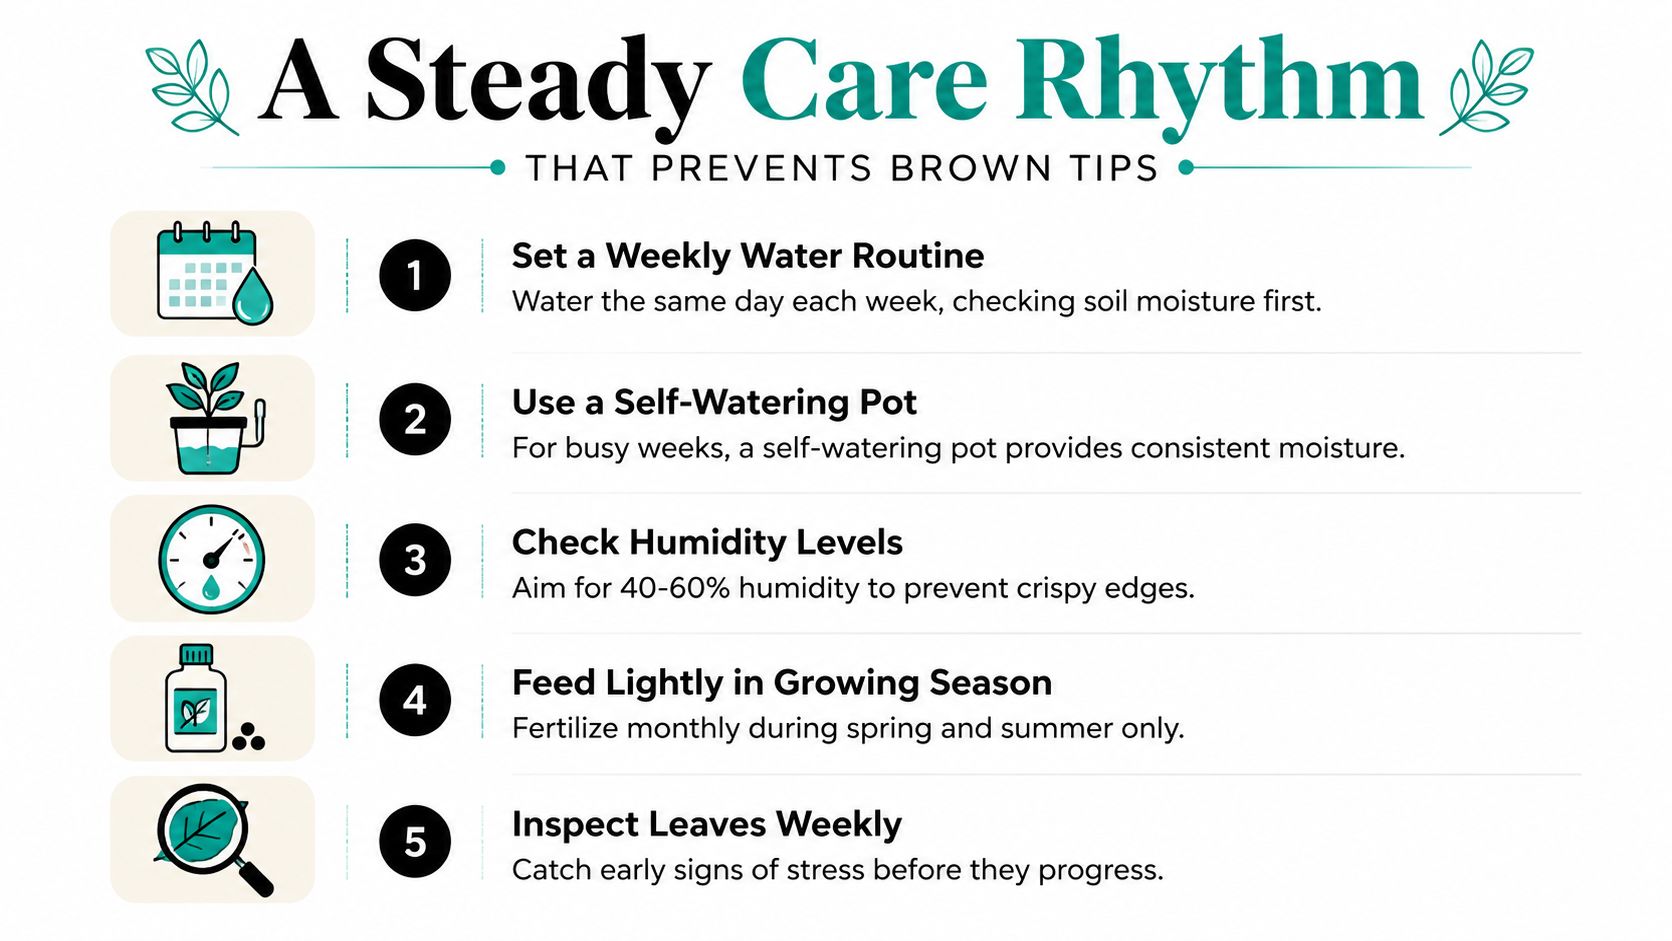
Busy owners often don't need a more complicated care plan. They need fewer dramatic swings. A practical rhythm starts with checking the soil every few days, then watering only when the upper layer has dried enough for that plant and pot. During active growth, feed lightly and keep notes so you can recognize what changed if the tips react.
Build a routine that survives real life
Choose a regular day for inspection, but let soil moisture decide whether watering happens. This matters for travelers and apartment dwellers because a calendar reminder can prompt a check without forcing water into a pot that's still damp.
A self-watering globe can serve as a bridge between manual waterings. Little Green Leaf's decorative globes release water gradually as the soil dries, with airflow slowing as moisture returns. Match the globe size to the pot volume, insert it into suitable soil, and refill the reservoir on a predictable schedule. Their listed sizes include 100 ml, 200 ml, and 350 ml, so selection should reflect the container and plant rather than a one-size-fits-all rule.
Let consistency do the work
A globe won't fix a salty potting mix, poor drainage, or very dry air. It can, however, reduce the abrupt change between forgotten dryness and rushed watering when used alongside normal checks. Other options include a self-watering pot, a reservoir planter, or a written care note for anyone helping while you travel.
For travel weeks: Check the soil before leaving, avoid saturating a wet pot, and use a gradual hydration tool only when it suits the plant's moisture needs.
The aim isn't perfect care. It's a small repeatable pattern that keeps the root zone from lurching between extremes and gives you enough information to respond early.
Your Weekly and Monthly Plant Care Checklist
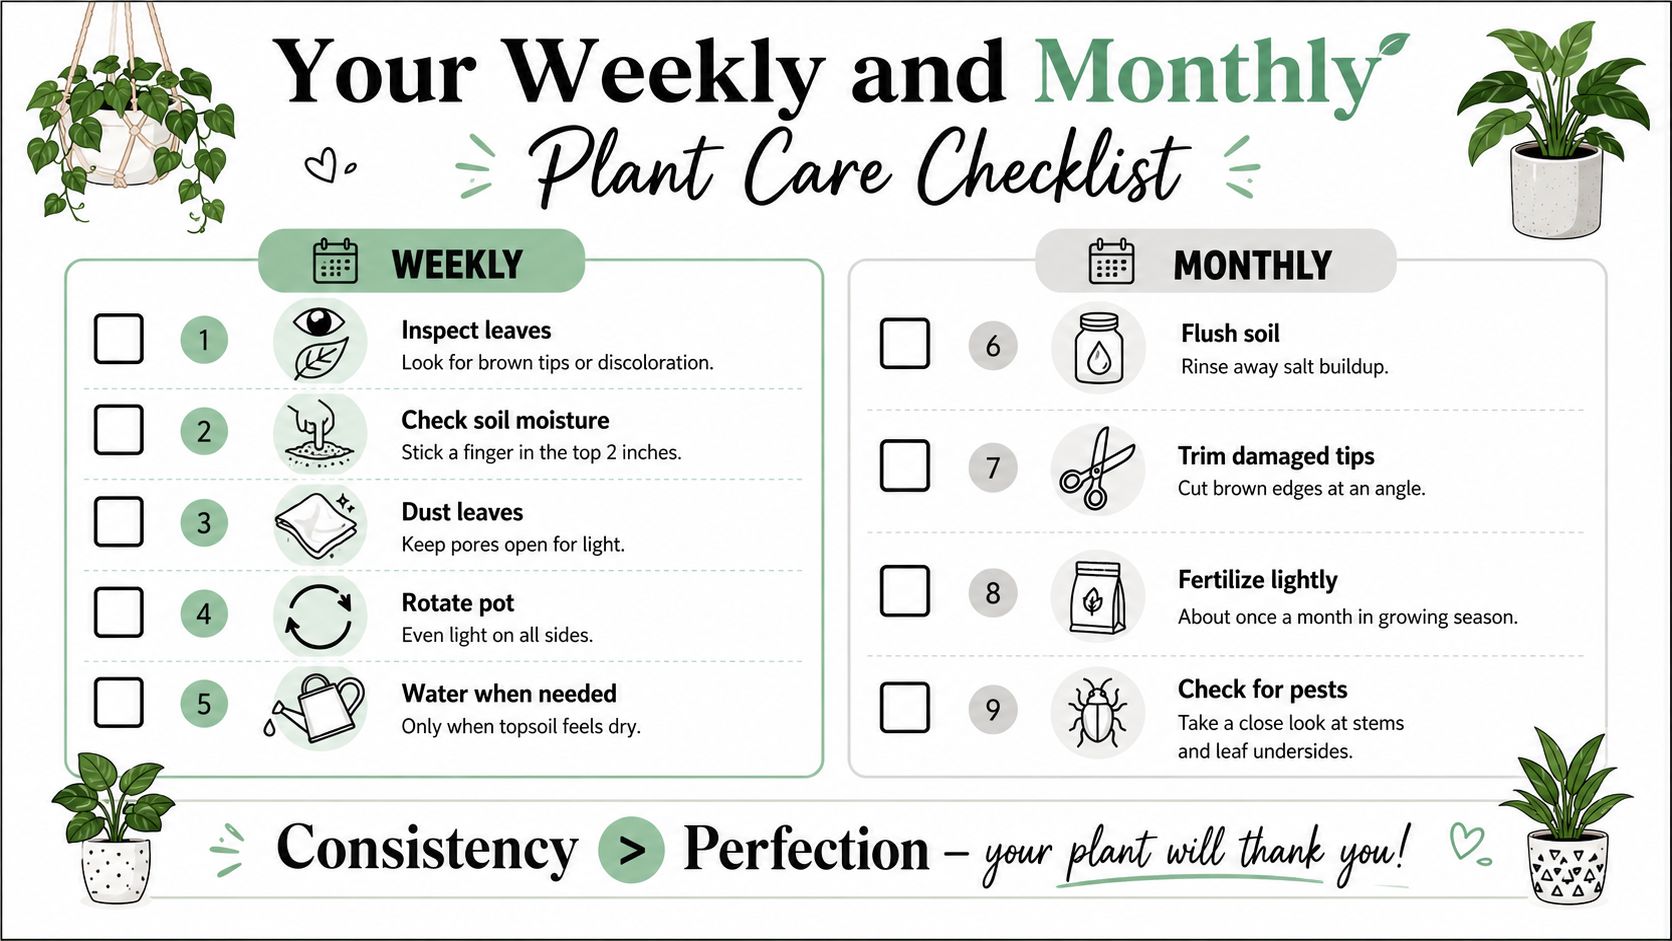
A checklist turns plant care into a familiar household rhythm. Save it on your phone, pin it near the watering can, or tuck it inside a cabinet door. The short inspections matter because they catch changes while the plant still looks mostly healthy.
Weekly habits
- Inspect the leaves: Look at tips, margins, stems, and undersides for browning, discoloration, speckles, or tiny webs.
- Check soil moisture: Push a finger into the upper root-zone area rather than judging only by the surface.
- Dust the foliage: Wipe broad leaves with a soft, damp cloth so dust doesn't obscure new symptoms.
- Rotate the pot: Turn it slightly to support more even light and prevent one-sided growth.
- Water when needed: Water thoroughly only when the mix has dried to the level appropriate for that plant.
Monthly resets
- Flush the soil: Use plain water to move accumulated fertilizer salts out through drainage.
- Trim damaged tips: Follow the leaf's shape with clean, angled scissors.
- Review feeding: Feed lightly during active growth only, and avoid adding fertilizer while the plant is stressed.
- Check reservoirs: If you use a self-watering pot or globe, inspect the water level and look for blocked flow.
- Inspect for pests: Examine leaf undersides, stems, and new growth closely.
Seasonal conditions deserve their own small note. In winter, indoor heating can dry the air, so humidity support may become more useful. Watering may also need to change as growth slows, and feeding should pause during dormancy rather than continuing automatically.
Your plant doesn't need a perfect caretaker. It needs someone who notices, makes one thoughtful adjustment, and returns to a steady routine.
Little Green Leaf offers decorative self-watering globes that provide gradual hydration for everyday pots, including options for busy schedules and travel weeks. If you'd like a simpler way to support consistent moisture while you keep checking your plant's leaves and soil, visit Little Green Leaf and explore the available plant-care tools.